If you want an instant, pre-written reply, or you want the submitters to get a copy of the data they have submitted on your form, then you will need to set up an Autoresponder Email, so let's get started!
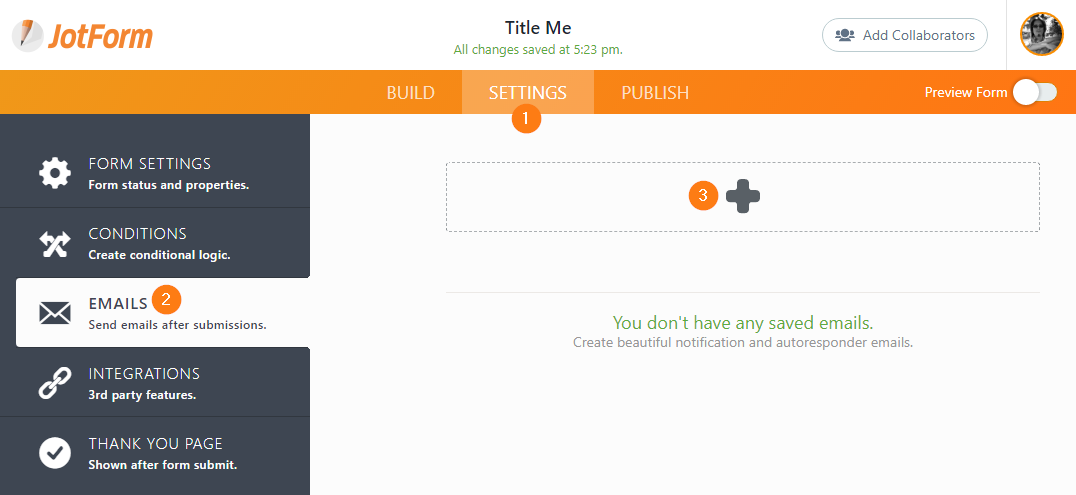
A. Click SETTINGS at the top of the Form Builder.
B. Next, click EMAILS on the left nav.
C. Click the + icon.
D. Then, select AUTORESPONDER EMAIL.

Each section is separated by tabs:
(Left) EMAIL Tab:
Allows you to setup the email template. Here's a screenshot of its main function:

1. Click the EMAIL tab to view it.
2. You can click the PENCIL icon and edit the name of the Autoresponder email.
3. You can input text here that will be used as the email's subject line. If you want to add a form field value on it, simply click the PENCIL icon and it will give you the list of form fields.
4. Here, you can see and add the FORM FIELDS in your email template. It'll give you the correct field tag specific to its related form field. An example would be, the field tag for the default name field, which is {name}.
5. This is the main body of the email template, you can edit, format, or style it as you like.
(Middle) RECIPIENTS Tab:
This allows you to set the sender name, reply-to email address, and set the recipient email field for where you want to send the Autoresponder.

Also, make sure to put your Sender Name. This can be your Name or Company Name. Reply-to Email should be your email address or the email address of your company. The very important part is the Recipient Email which will be the email field of your form. You have to select it from the dropdown.
(Right) ADVANCED Tab:
In the ADVANCED tab, there are optional features that you can use, though none of them are required.

1. You can check the SEND ON EDIT option if you want the Autoresponder to be sent when the submission is edited.
2. You can send the submission as a PDF ATTACHMENT.
3. You can ATTACH A FILE.
4. You can SEND EMAILS LATER.
5. You can HIDE EMPTY FIELDS.
6. Setup the SENDER EMAIL. Please note that it is strongly recommended to keep noreply@jotform.com as the Sender Email because this helps to ensure that the Autoresponder is not identified by the recipient's email provider as spam.
7. Keep the UPDATE EMAIL toggled to YES. While this option is disabled, changes on the form will not affect the email content, so it won't auto-update.
E. Finally, click the SAVE button and make sure that all of the changes in your Autoresponder were applied.
If you'd like to see how your Autoresponder looks like, you can test your form Autoresponder email by clicking the TEST EMAIL button. You should receive the test email to your account's registered email address. You can also test the form by filling it out to submit actual data using a valid test email.
Additionally, there is also the chance that you may have more than one Email Address that you wish to use in your Autoresponder to be listed with the notification being sent to Multiple Recipients.
If you want to use your own Email Address as the Sender Email, that is now possible with Jotform. There are two methods that you can use:
How to Add a Custom Sender Address to an Email Alert
How to Setup SMTP for a Form
NOTE: If you're looking for a way to setup a text only email, this is not possible anymore. The new wizard will allow you to only change the HTML email, text only emails are actually no longer used as mobile devices are becoming more common and all can open HTML-based emails without issues.